Measurement & installation guide for roller blinds
HOW TO MEASURE
Select the type of installation:
- In front of the window opening (on the wall or ceiling, in front of the window)
- Inside the window opening (into the recess, reveals)
A) Measurement for installation in front of the window opening
Step 1: Measure the fabric width
For installation in front of the opening, first determine the desired overlap of the fabric over the window opening. The larger the fabric overlap, the less light will pass through the gap between the fabric and the wall. We recommend a fabric overlap of 30 - 60 mm on each side and a standard roll-up. Then, measure the total width of the fabric.
Remember, when ordering the blind, you will input the total width of the blind including the brackets into the configurator. Therefore, you need to add 20 mm on each side to the fabric width for the brackets (values A and B in the image and according to the table below).
Step 2: Measure the blind height
Depending on the chosen installation (on the wall or ceiling), measure the height of the blind from the top point to the desired bottom end position (the place where the fabric should unwind to; usually the window sill or the floor). Here, you are measuring the height of the entire blind, and this is the value you will input for ordering in the configurator.
Video guide for installation in front of the opening

PRACTICAL EXAMPLE - BLIND WIDTH:
I want the fabric to overlap the window opening by 40 mm on each side.
I measure the width of the opening (e.g., 1500 mm), add 40 mm for fabric overlap on each side (total 1580 mm), and for the manufacturing dimension of the blind, I add according to the table below 20 mm on the left and 20 mm on the right (deductions A and B for the placement of brackets and blind mechanism, total 1620 mm).
Therefore, I input the total width of 1620 mm into the configurator.
PRACTICAL EXAMPLE - BLIND HEIGHT:
The window opening is high from the top reveal to the window sill 1400 mm.
I want to mount the blind just above the window opening. The blind including brackets and bottom rail extends 90 mm above the window (wall installation, see table below).
Therefore, I input the total height of 1490 mm into the configurator.

B) Measurement for installation inside the window opening
Step 1: Measure the fabric width
Measure at the top of the opening. If the sides are straight, subtract 2 mm from the measured value (measurement tolerance/clearance).
If the sides are not perfectly straight (max. deviation ±10 mm), subtract 4 mm from the measured value to be safe.
Step 2: Measure the blind height
Perform the measurement from the top edge of the opening to the desired bottom end position of the blind (the place where the fabric should unwind to; usually the window sill).
We recommend subtracting 5 mm from this value so that the bottom load bar of the blind does not hit the window sill or other element.
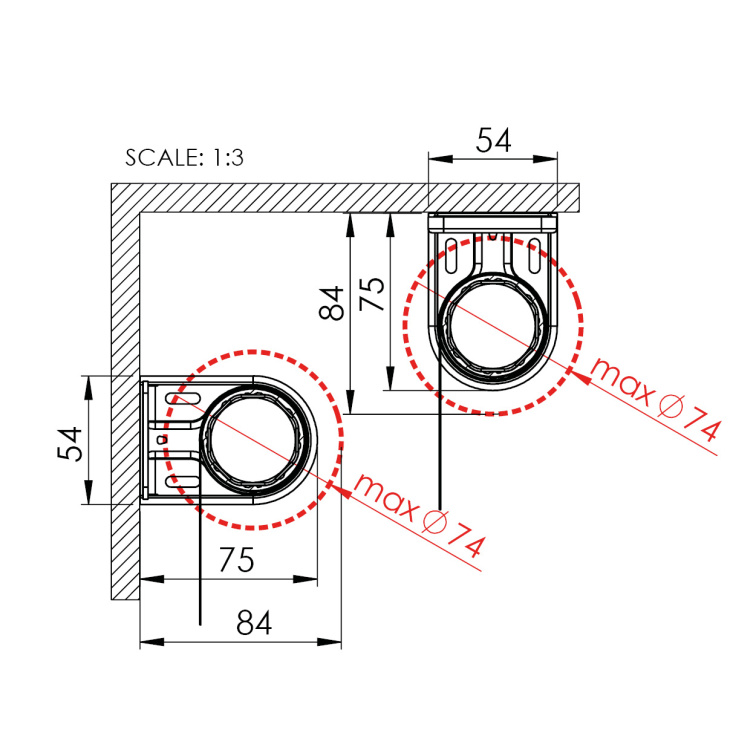
Table of Bracket Additions
|
Side of the blind |
Addition [mm] |
|
A |
20 |
|
B |
20 |
Choice of Lof fabric unwinding direction
If there is an obstacle preventing the blind from unwinding (e.g., a window handle), or if you want the fabric to unwind from the blind towards the room (e.g., so the edge of the fabric aligns with the wall when installed inside the window opening), you can order the blind with reverse winding.
| TYPE | DESCRIPTION |
| Standard (A) | The fabric unwinds behind the blind |
| Front (B) | The fabric unwinds in front of the blind |
TECHNICAL PARAMETERS:
|
Parameter |
Value |
|
Min. blind width |
600 mm |
|
Max. blind width |
3000 mm |
|
Max. blind height |
3000 mm |
|
Shaft diameter |
43 mm (without fabric), 74 mm (with fabric, maximum roll-up) |
|
Bracket dimensions |
75 × 54 mm |
|
Available bracket colors |
white (RAL 9016), grey (RAL 7035), black (RAL 9005) |

Bracket dimensions
HOW TO INSTALL A FABRIC BLIND
Each ACCUBLIND blind comes with a detailed installation guide that will walk you through the installation step-by-step.
⚠️Important Information - Before Installation
Suitable substrates for installation: Ensure you are installing on a suitable substrate - concrete, brick wall, plasterboard, or wood.
For covering wider areas, two blinds can be installed closely next to each other.
QR code for motor pairing with the application should be kept for possible later use.
After unpacking, do not remove the motor from the blind - doing so might misalign the end positions. Also, ensure the motor does not fall out of the blind during handling during installation.
Yellow fixing tapes on the fabric should be removed only after the installation of the blind is complete.
If you want to mount the blind into the window opening, ensure it will not interfere when opening the window (see table on how much space the blind bundle takes).
INSTALLING A FABRIC BLIND
1. Check the dimensions on the blind label
On the label on the packaging, you will find the total width and height of the blind (including brackets) as you ordered it.
2. Mark the drilling points
Attach the bracket with the plastic cover on the left/right side and find the center of the bracket.
Then mark the bracket center on the other side according to the spirit level/laser. Measure and mark the spots for drilling holes (4 points - 2 on each side).
The blind must be perfectly mounted horizontally. Meanwhile, remove the plastic covers from the brackets.
3. Drill the holes
Choose the type of drill bit and anchors according to the material (e.g., brick, wood, plasterboard).
4. Fix the brackets
Using screws (recommended: diameter 3.5 mm, length at least 35 mm). Make sure the appropriate bracket is on the correct side.
5. Clip the blind to the brackets
Install the blind into the brackets - pay attention to the correct side for operation.
The blind must click firmly into place.
6. Cover the brackets with the covers
Simply slide the covers onto the brackets.
7. Test the functionality of the blind
Test the functionality of the blind using the remote control. The blind should smoothly unwind and rewind.
8. Done - Your blind is installed, fully functional, and ready to use!
💡Useful Tips
Installation tolerance: Allowed installation deviation is -0/+5 mm. Do not bring the brackets closer to each other – the width including the bracket covers must not be narrower than the ordered system width. You can place them a bit farther apart – but no more than 5 mm wider than the ordered width.
Fine-tuning end position: You can subtly fine-tune the bottom end position of the blind using the remote control (instructions included). The blind has in the roll a safe reserve of fabric – up to 50 mm for possible need to change the end position.
